 Save to Pinterest
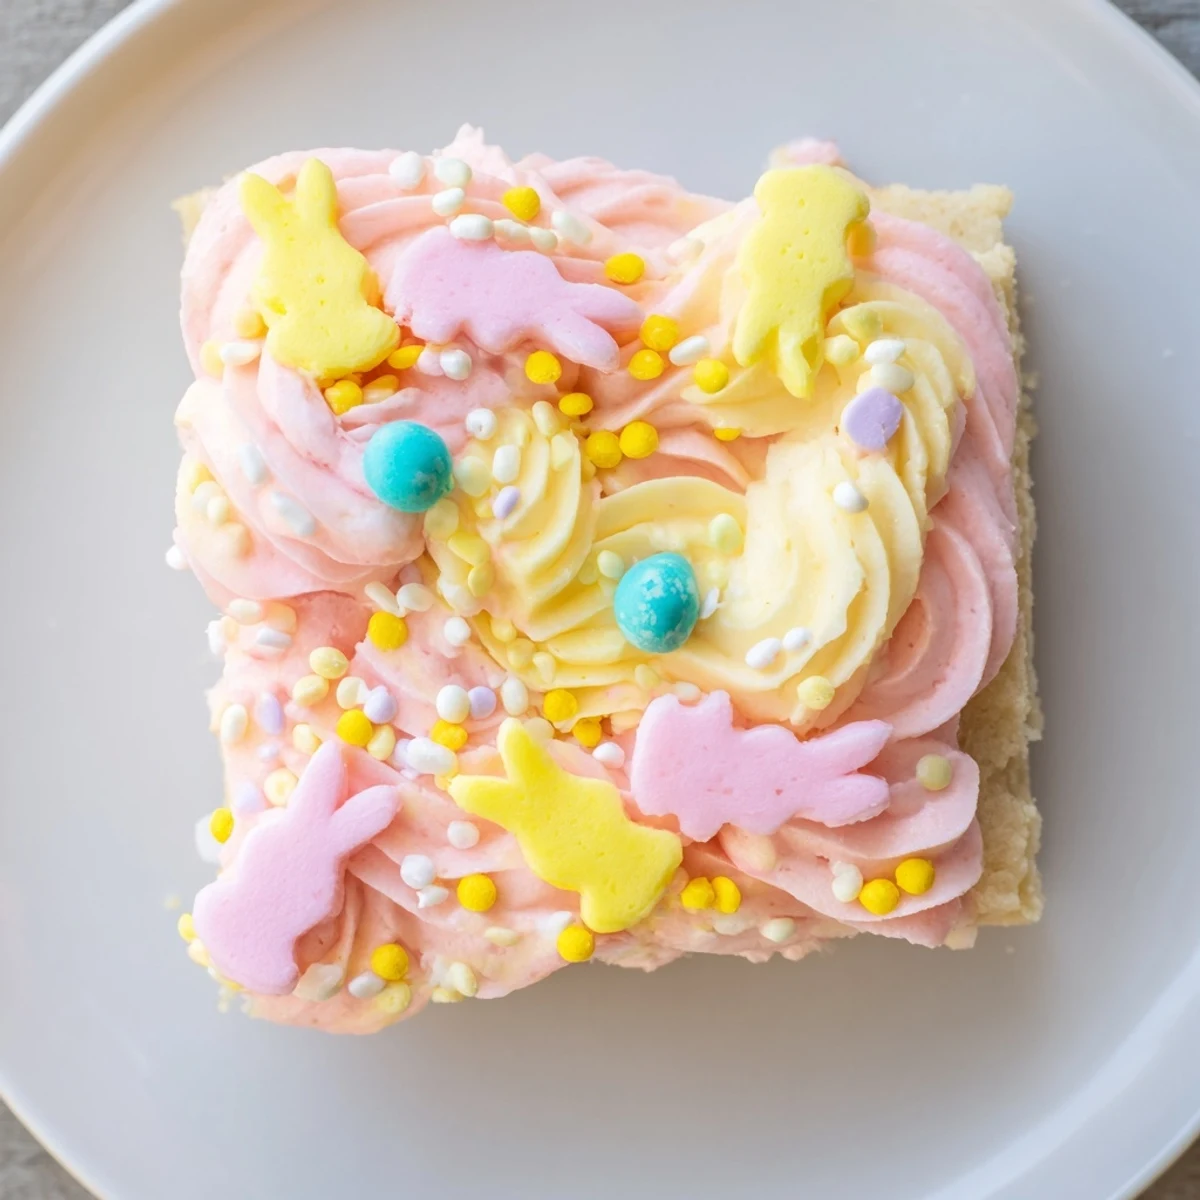
 These soft sugar cookie bars combine a tender, buttery base with silky pastel frosting and colorful Easter sprinkles. The dough comes together quickly with basic pantry staples, and while the bars bake, you can prepare the creamy buttercream frosting. Divide the frosting and tint it with soft pastel colors—pink, yellow, green, or purple—to create a festive Easter dessert that's both beautiful and delicious. The bars stay moist for days, making them ideal for advance preparation or gifting to friends and family.
Last Easter, my kitchen became a chaotic art studio. I'd planned elegant individual cookies, but when my niece walked in with a bag of pastel sprinkles she'd picked out herself, everything changed. We ended up pressing those sprinkles into warm frosting-covered squares, eating more sprinkles than we actually decorated with, and creating something far better than my original vision. Sometimes the best holiday memories aren't about perfection at all.
My sister-in-law texted me at 11 PM the night before our family Easter gathering, frantic that she'd forgotten to assign dessert. I told her not to worry, threw together these bars while half-asleep, and woke up to them cooling on the counter. By noon, they'd disappeared so completely that people were actually asking where the rest of the dessert was. Now they're the only thing I'm allowed to bring.
Ingredients
- 2 1/4 cups all-purpose flour: I've learned that measuring by weight (270 g) gives the most consistent tender texture, but the spoon-and-level method works fine too
- 1/2 teaspoon baking powder: Just enough to give these bars a subtle lift without turning them into cake
- 1/4 teaspoon salt: Don't skip it; that tiny pinch balances all the sugar and makes the butter flavor really sing
- 1/2 cup unsalted butter, softened: Room temperature butter creates the perfect creamy texture, so take it out at least an hour before baking
- 1 cup granulated sugar: This amount creates a tender crumb without being cloyingly sweet
- 2 large eggs: Room temperature eggs incorporate better and help create that smooth, even texture we're after
- 1 teaspoon pure vanilla extract: Use the good stuff here; it's the backbone flavor that ties everything together
- 1/2 teaspoon almond extract: Completely optional, but I love how it adds that classic sugar cookie bakery flavor everyone tries to identify
- 1/2 cup unsalted butter for frosting: Again, softened to room temperature is non-negotiable for silky smooth results
- 2 cups powdered sugar, sifted: Sifting prevents those frustrating lumps that never quite beat out, no matter how long you mix
- 2–3 tablespoons whole milk or cream: Start with 2 tablespoons; you can always add more, but you can't take it back
- 1/2 teaspoon vanilla extract for frosting: Complements the cookie base beautifully
- Food coloring in pastel tones: Gel colors give more vibrant results with less liquid, which keeps your frosting consistency perfect
- Festive Easter sprinkles: Let whoever's helping pick their favorite shapes and colors; that's half the fun
Instructions
- Getting Everything Ready:
- Preheat your oven to 350°F (175°C) and grease a 9x13 inch baking pan, then line it with parchment paper, leaving those handy overhangs on the long sides. This setup makes lifting the whole baked slab out effortless later.
- Whisking the Dry Team:
- In a medium bowl, combine the flour, baking powder, and salt with a whisk, breaking up any clumps and making sure everything is evenly distributed.
- Creaming Butter and Sugar:
- Beat the softened butter and granulated sugar together until the mixture looks pale and fluffy, which usually takes about 3 minutes. Add the eggs one at a time, really beating after each addition, then mix in both extracts.
- Bringing It All Together:
- Gradually add the flour mixture to your butter mixture, mixing just until you no longer see dry streaks. The dough will be thick and soft, which is exactly what you want for these bars.
- Spreading and Baking:
- Press the dough evenly into your prepared pan using an offset spatula or the back of a spoon. Bake for 18–20 minutes, checking at 18 minutes; you want the edges barely golden and the center set but still soft.
- The Cooling Game:
- Let the bars cool completely in the pan before frosting. This step requires patience, but it prevents your beautiful pastel frosting from melting into a sad, streaky mess.
- Making Perfect Frosting:
- Beat the butter until creamy, then add the powdered sugar, vanilla, and 2 tablespoons of milk. Beat until fluffy and smooth, adding more milk only if needed; the frosting should be spreadable but not runny.
- Adding Pastel Magic:
- Divide your frosting into separate bowls if you're using multiple colors, then add a tiny bit of gel food coloring to each portion. Mix thoroughly, adding more color gradually until you achieve those soft Easter shades you're after.
- Frosting and Decorating:
- Spread your colored frosting over the completely cooled cookie base, either creating sections of different colors or swirling them together artistically. Immediately shower the surface with sprinkles while the frosting's still soft enough to hold them.
- The Grand Finale:
- Use those parchment overhangs to lift the entire slab out of the pan, then transfer it to a cutting board. Cut into 16 squares, wiping your knife between cuts for those picture-perfect clean edges.
 Save to Pinterest
 My grandmother, who baked for every church function and family gathering for sixty years, tasted these and asked for the recipe. She wrote it down on the back of an old church bulletin in her careful cursive, and I found it in her recipe box after she passed. Now whenever I make them, I think of her approving nod and how the simplest recipes are often the ones that become treasured traditions.
Making These Your Own
I've discovered that adding fresh lemon zest to either the dough or the frosting gives these bars an incredible brightness that cuts through all that buttery sweetness. Sometimes I'll do half vanilla frosting and half lemon, creating a swirled effect that looks almost too pretty to eat. Orange zest works beautifully too, especially if you're aiming for those warm spring flavors that feel so appropriate for Easter.
Frosting Like a Pro
After years of struggling with uneven frosting, I finally discovered the joy of using an offset spatula and the technique of starting with more frosting than you think you need. Drop generous dollops across the cooled bars, then use long, confident strokes to spread it out. If you're creating multiple colored sections, a simple piece of wax paper pressed into the frosting between colors creates clean, professional-looking lines without any special tools.
Storage and Make-Ahead Tips
These bars actually taste better on day two, after the frosting has had time to meld with the cookie base and soften it even more. I've made the base up to two days ahead, wrapped it tightly in plastic wrap while still in the pan, and frosted it the morning of our gathering. Just make sure it's completely cooled before wrapping, or condensation will make the surface soggy.
- Store at room temperature for up to 4 days, covered with plastic wrap or in an airtight container
- Refrigerate if your kitchen is particularly warm, but bring to room temperature before serving for the best texture
- These freeze beautifully unfrosted for up to 2 months; thaw overnight and frost the next day
 Save to Pinterest
 These sugar cookie bars have become our family's official harbinger of spring, appearing on every Easter table and somehow vanishing before the main dishes are even cleared. They're not just dessert; they're a sweet reminder that some traditions start by accident and become the best parts of celebrating together.
Recipe Questions & Answers
- → Can I make the cookie dough ahead of time?
-
Yes, you can prepare the dough up to 2 days in advance and refrigerate it tightly wrapped. Let it come to room temperature before spreading in the pan and baking.
- → What's the best way to achieve even frosting colors?
-
Use gel food coloring instead of liquid for more vibrant, concentrated hues. Start with a tiny amount and add gradually until you reach your desired pastel shade.
- → How do I know when the bars are done baking?
-
The edges should be barely golden and the center set. A toothpick inserted in the middle should come out clean or with just a few moist crumbs. Avoid overbaking for the softest texture.
- → Can I freeze these decorated bars?
-
Freeze undecorated bars wrapped tightly for up to 3 months. Thaw overnight, then frost and decorate. Frosted bars don't freeze well as the moisture affects the sprinkles and frosting texture.
- → What size pan works best?
-
A 9x13 inch pan is ideal for bars that are neither too thick nor too thin. If using a different size, adjust baking time—thicker bars need more time, thinner ones need less.
- → Can I use natural food coloring?
-
Absolutely. Fruit and vegetable juices like beet, raspberry, or spinach create soft pastel shades. Keep in mind natural colors may be subtler than artificial options.